In the previous blog, I wrote about finding Left & Right view of a Binary Tree.
In this blog, I'm going to talk about Top & Bottom view of a binary tree and will again try to create a single approach that will solve both the problems so instead of understanding two different approaches we'll discuss a single approach for it.
Firstly, let us understand "What is the Top/Bottom view of a binary tree?". When a tree is viewed from the Top/Bottom then the only nodes visible from that particular view are printed/included in output.
For example :
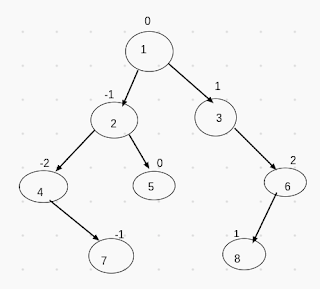
For the above mentioned binary tree nodes in Top & Bottom View are as follows :
Top View -> 4, 2, 1, 3, 6
Bottom View -> 4, 7, 5, 8, 6
Let's try to understand it for the top view and the bottom view will be similar with minor changes. Looking from the top 4 is visible so we've included it in our top view, similarly, 2 is visible so we've included it in our top view, 7 is getting overlapped by 2 so we've ignored it. Similarly, 1 is visible so we've included it and 5 is overlapped by 1 so we've ignored it. Then, in the same manner, 3 & 6 are also included. That's how we included nodes in our top view.
Looking at the above image you can see that I've mentioned some numbers outside the nodes. Example : 0 outside node(1), -1 outside node(2), 1 outside node(3) and so on...
What exactly are these numbers?
These are the horizontal distances, we initialize the horizontal distance at root i.e. node(1) => 0 and whenever we go to the left of root we add -1 and when we go to the right of root then we add +1.
That is why our root i.e. 1 has an HD (Horizontal Distance) =>0
It's left node i.e. has a HD => 0-1 = -1
It's right node i.e. 3 has HD => 0+1 = 1
Similarly the left node of 2 i.e. 4 has a HD => -1 +(-1) = -2
Similarly the right node of 2 i.e. 5 has a HD => -1 + 1 =0
I hope now these numbers (Horizontal Distances) make sense to you.
Try looking back at the above image and the nodes included in Top View there's a pattern in it which I'll be revealing soon.
Let's split the tree into various levels horizontally.
Now, further split this tree vertically.Did you observe something now? The nodes with the same horizontal distance lie on the same vertical axis.
For Example for the above mentioned image :
-1 (HD) -> 2 & 7,
0 (HD) -> 1 & 5,
1 (HD) -> 3 & 8
Now, let's reveal the pattern for both Top & Bottom views of a Binary Tree.
Top View -> The nodes which have a minimum level (horizontally) for a given horizontal distance will be included in its top view.
Bottom View -> The nodes which have a maximum level (horizontally) for a given horizontal distance will be included in its bottom view.
The above binary tree nodes in various horizontal distances are :
HD Nodes
-2 -> 4
-1 -> 2, 7
0 -> 1, 5
1 -> 3, 8
2 -> 6
So, now checking for nodes with minimum level (horizontally) for top view considering root is at level 0:
HD Nodes min. level
-2 -> 4 2
-1 -> 2 1
0 -> 1 0
1 -> 3 1
2 -> 6 2
So the above-mentioned nodes are considered in Top View.
Similarly the for Bottom view we'll consider max. level (horizontally)
Implementation :
Top View
// utility function
void top_view_func(node *root,int hd,int level,auto &mp)
{
    if(root==NULL)
        return ;
    if(mp.find(hd)==mp.end() || level<=mp[hd].second)
    {
        mp[hd]={root->data,level};
    }
    top_view_func(root->left,hd-1,level+1,mp);
    top_view_func(root->right,hd+1,level+1,mp);
}

// main function
void top_view(node *root)
{
map<int,pair<int,int> >mp;
top_view_func(root,0,0,mp);

for(auto i :mp)
{
    cout<<i.second.first<<" ";
}
}
Bottom View
// utility function
void bottom_view_func(node *root,int hd,int level,auto &mp)
{
    if(root==NULL)
        return ;
    if(mp.find(hd)==mp.end() || level>=mp[hd].second)
    {
        mp[hd]={root->data,level};
    }
    bottom_view_func(root->left,hd-1,level+1,mp);
    bottom_view_func(root->right,hd+1,level+1,mp);
}

// main function
void bottom_view(node *root)
{
map<int,pair<int,int> >mp;
bottom_view_func(root,0,0,mp);
for(auto i :mp)
{
    cout<<i.second.first<<" ";
}
}
I hope this tutorial helped you!
Happy Coding!


Comments
Post a Comment
Your Feedback Will Help Us To Improve...